Github Pages是github提供的免费静态博客平台,使用hexo静态博客+NexT主题能够快速地搭建优雅的博客。多次地搭建及放弃之后,再次从头搭建博客,记录一下创建、备份及今后还原的流程,为之后的学习笔记、论文笔记和解题报告作记录平台。
创建博客
首先需要在github上创建一个repo,其中
Repository name需要固定格式为your_name.github.io,这样github会自动识别为Github Pages在本机先安装好git、ssh、node、hexo,创建hexo文件夹,安装好插件
1
2
3
4
5
npm install hexo-cli -g
hexo init blog_folder
cd blog_folder
npm install
npm install hexo-deployer-git --save # hexo的git插件修改
_config.yml中的Deployment部分,关联自己的repo1
2
3
4
5
6# Deployment
## Docs: https://hexo.io/docs/deployment.html
deploy:
type: git
repo: ssh://git@github.com/your_name/your_name.github.io
branch: master这样之后就能完整使用博客的各个功能了,具体的用法见hexo指令
1
2
3
4
5
hexo g # generate生成显示页面
hexo c # 清除缓存
hexo s # 本地预览
hexo d # 自动generate并deploy到github
# 一般就使用hexo s预览一下再hexo d发布就可以
备份源文件
由于博客发布的远程仓库的master分支是经过编译的html文件,而我们需要保存源文件、更改后的配置等以进行新机器上的还原。在多次的博客搭建过程中,逐渐找到了比较优雅的备份还原方式。
一开始使用的是使用私人仓库gitlab/github进行源文件备份,这样到了新的机器只需按照还原流程进行还原。后面为了集中在一个repo下,将源文件放在同一个repo中的新branch下。这样一个master分支用来展示博客页面,一个source分支用来备份源文件。
特别注意的是,不必担心源文件中的隐私会被泄露,因为有关隐私的配置都在主题仓库中,此公开的source分支并不会存储隐私配置。
在博客目录下初始化本地git并关联远端
1
2
git init
git remote add origin git@github.com:your_name/your_name.github.io.git创建
source分支并推送源文件1
2
3
4git checkout -b source
git add .
git commit -m "Initial backup"
git push origin source:source这里source source会在远端创建分支
在每次修改博客之后,需要做deploy到
master分支和push到source分支两件事1
2
3
4hexo d
git add .
git commit -m "Any comment"
git push origin source:source在github repo的settings中将source分支改为默认分支,可以简化为
git push如果有第三方主题的子模块,需要先进行子模块的
add和commit可以使用Appveyor进行事件触发,
push后自动deploy
第三方主题
我们一般会直接clone第三方主题的仓库,这样进行修改后是无法同步到远程仓库的。目前网上博主们推荐的做法是:fork该第三方主题仓库,在自己账号下生成一个同名的仓库,使用submodule进行多个仓库的嵌套。而由于将源文件放公开仓库的分支下,为了保存主题中隐私文件,我们需要设置为一个私人仓库,所以考虑使用镜像仓库。
在github中创建一个私人仓库
hexo-theme-next,存放需要fork的仓库,从目标仓库clone下来,并推送到远端的私人仓库1
2
3
4
5git clone --bare git@github.com:theme-next/hexo-theme-next.git
cd hexo-theme-next.git
git push --mirror https://github.com/your_name/hexo-theme-next.git
cd ..
rm -rf hexo-theme-next.git如下命令会克隆仓库到本地作为子模块
1
2
cd cd blog_folder
git submodule add git@github.com:your_name/hexo-theme-next.git themes/next
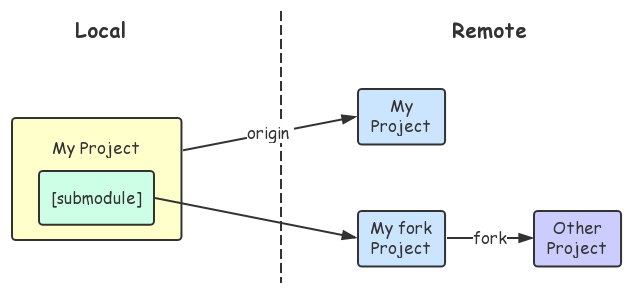
而为了同步源仓库的latest,我们需要为fork的仓库添加
upstream,添加成功之后通过remote -v查看1
2
3
4
5
6
7ζ cd themes/next
ζ git remote add upstream git@github.com:lvraikkonen/hexo-theme-next.git
ζ git remote -v
origin git@github.com:your_name/hexo-theme-next.git (fetch)
origin git@github.com:your_name/hexo-theme-next.git (push)
upstream git@github.com:theme-next/hexo-theme-next.git (fetch)
upstream git@github.com:theme-next/hexo-theme-next.git (push)这样就可以通过使用
fetch/merge,拉取上游仓库upstream的分支并且合并到本地仓库进行fork仓库的同步,再提交到远程仓库1
2
3
4
5
6
7# only fetch master
git fetch upstream master
git merge upstream/master
# or fetch + merge
git pull upstream master
# 将改动提交到Remote repo
git push
还原
同样先安装好git、ssh、node、hexo,使用
git clone克隆source分支的源文件,--recursive参数可以同步还原submodule1
git clone -b source git@github.com:your_name/your_name.github.io.git --recursive
如果已将
source分支设置为默认分支,可省略-b source参数也可以使用
git submodule init和git submodule update进行子模块的还原安装依赖
1
npm install
如果想要更新hexo到最新版本,可以通过npm update命令进行更新
文档及参考
hexo指南
Next文档
- 使用submodule管理子模块
- Hexo + Next 主题博客提交百度谷歌收录